Video Player
Overview
Reference material for Video Player in WinTAK, sourced from the official WinTAK 5.7 Software User Manual (26 March 2026).
Manual Reference

The Video Player supports playing a variety of video streams and files. The menu allows the ability to add, edit, delete, play, download from a TAK Server or send videos to other network users. Select the Video Player icon to open the Video Player.
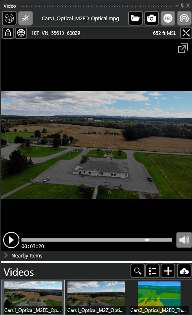
Playing a stored video

To play a stored video file, select the Open Video File icon, use the file explorer to locate the video and then select it to begin playing the video. Alternatively, manually place video files in C:\Users\username\Videos\WinTAK to have them automatically show up in the list of available videos. Pause, play and audio/speaker control icons appear on the running video screen when the mouse is hovered over it.
The audio/speaker icon will be grayed out if the video doesn't contain sound.
Screenshots, recording and rebroadcast

To save a screenshot of the current video, select the Screenshot (camera) icon. The image will be saved in the C:\Users\username\Pictures\WinTAK\Video Screenshots\ folder.

To start the recording of a video stream, select the Record icon, then select Record again to conclude the recording. This feature is currently only supported by UDP streams but offers the ability to record segments of a stream and view those recordings at a later time. Recorded stream segments can be accessed in the C:\Users\username\Videos\WinTAK\Video Recordings\ folder.

To rebroadcast an incoming video stream, select the Rebroadcast icon. Select the Rebroadcast icon again to stop rebroadcasting. Currently only UDP and RTSP streams are available to rebroadcast onto the TAK Network. To change/set rebroadcast settings, navigate to Additional Tools > Settings > Tool Preferences > Video Preferences.

The video display window can be undocked by dragging and dropping it away from the map window. Multiple video files can be played by selecting the Open video in new window icon which is located in the upper right corner of the currently playing video.
Adding a Video Stream
To add a video alias, select the + button and enter a new video alias manually. Enter the Alias Name and select the Protocol (UDP, RTSP, RTMP, RTMPS, TCP, RTP, SRT, HTTP, HTTPS, RAW) along with the necessary streaming information including IP address (leave IP blank to listen on your own IP), Port Number, file name (if appropriate), Network Timeout, Buffering and Buffer Time. Selecting buffering along with a buffer time will provide a small amount of buffering of input video flow to help smooth video streams. Adding buffering will increase latency. When done, select Save.
A video alias can also be added to a Sensor Point from the Mission Specific icon palette within the Point Dropper Tool. Open the Sensor Point's details window to add or edit the video URL. View the video by selecting Video from the Sensor Point's details window or radial menu. When the Sensor Point is sent to other users, the associated video URL will be automatically included.

Select the Add Video From Server icon to download an alias from the TAK Server.

Video aliases may be sent to other network members by right-clicking the video listing, then selecting Send. Multiple video aliases can be sent by selecting the Select Multiple Videos icon, checking all videos to be sent and then selecting the Send icon. One or more members may be selected. Click the Send button to send to the intended recipients.
To edit an existing Video Alias, right-click it and select Edit to access the same options as shown for the Add Video Alias option. During editing, the video alias can be renamed or redirected to a new address and port combination.
To delete an existing video, right-click it and select the Delete icon to the right of the desired video alias and confirm deletion.

Select Search to search for a specific video alias. After entering text into the provided field, the list of available video aliases will be filtered to match the search terms.
Viewing KLV
If a video includes KLV location data, corresponding markers will automatically be displayed on the map. These markers indicate the map location of the sensor or other points of interest at the corresponding time viewed within the video player.
The DP marker will indicate the center of view corresponding to that sensor as the video plays. Zoom to the DP or CoT Marker by selecting the Zoom To icon on the video controls or lock onto the sensor by selecting the Lock icon on the radial.
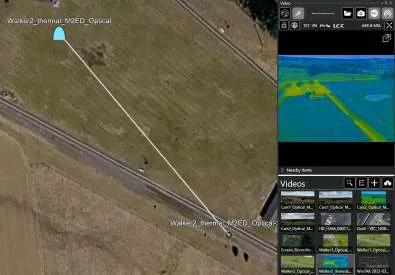
Videos with KLV location data have access to Bloodhound and Compass Navigation options which utilize the Digital Pointer (DP) produced by the video stream. These features are discussed in the Range & Bearing module.

Live Video Map Display

Video files or video streams that contain metadata for the four corners of the video can be projected onto the map. Connect the video alias or open the video file, then click the Globe icon in the upper left corner of the video window, turning the globe green. Then select the Lock icon to pan to the video projected onto the map. The video will overlay upon any current imagery displayed.
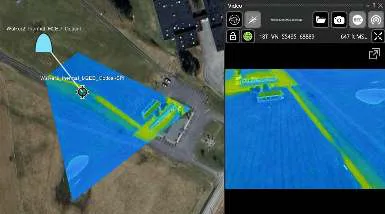
Source
WinTAK Software User Manual, Version 5.7, 26 March 2026, pages 55–57.