Placement
Overview
Reference material for Placement in WinTAK, sourced from the official WinTAK 5.7 Software User Manual (26 March 2026).
Manual Reference

Locations of interest can be entered using the Point Dropper Tool. Select the Point Dropper icon to access different types of markers to drop on the map, edit the details and share data/information with other network members.
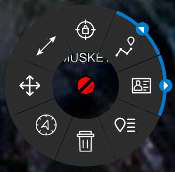
Once any marker is placed, all functions/details can be accessed by selecting the marker to bring up its radial.
The Coordinate Indicator (located in the lower left corner of the map interface) displays the geographic location and elevation of the mouse pointer.

To set coordinate preferences, select Settings > Display Preferences > Unit Display Format Preferences > Coordinate Display and choose an option. Coordinate display options include MGRS, Decimal Degrees, Degrees & Minutes, Degrees, Minutes & Seconds and UTM.
Self Marker

The Self-Marker is displayed as a blue arrowhead at the user's current location. The options available on the Self-Marker radial are: Polar Coordinate Entry, Fine Adjust, Measure, GPS Lock to Self, Breadcrumbs (with access to Track History from sub-radial) and Details.

WinTAK supports the following GPS devices: Globalsat USB BU-253S4, Dual Electronics Bluetooth XGPS 160 and the Bad Elf Bluetooth GNSS Surveyor. A Stationary GPS option is also available in Settings > My Preferences > GPS Preferences > GPS Type. This option is useful for operation centers that have machines without built-in GPS capabilities. Use the Stationary Location option to set the Self-Marker's location, even after exit and restart. Other options include: External GPS, Internal GPS, Network provided GPS, Route Simulator Location Provider and Off. The Route Simulator Location Provider option allows the user to have their Self-Marker follow a selected route at a specified speed. See the Route Planning and Navigation module for more information on this option.
Other TAK users
Other TAK users appear on the display as a colored circle. The color of the circle represents the user's Team affiliation, with additional lettering inside the circle to identify the role of the user on the team. Team member markers that include a diagonal line indicate that the GPS location is not available. A solid icon indicates that the team member has GPS reception.
Available roles include: Team Member, Team Lead (designated by a TL in the center of the marker), Headquarters (HQ in center), Sniper (S), Medic (+), Forward Observer (FO), RTO (R) or K9 (K9).
The options available when the user selects another user's Self-Marker are: Delete, Polar Coordinate Entry, Fine Adjust, Measure, GPS Lock on Friendly, Breadcrumbs, Contact Card and Details.
Point Dropper
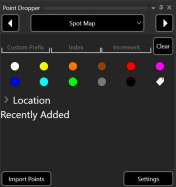
Select the Point Dropper icon to open the Point Dropper Tool panel. Select from the icon sets and individual markers within that set to add them to the map. Move between icon sets by selecting the left or right arrows next to the set name. Select the down arrow next to an icon set name for a drop-down menu of all available icon sets.

The Marker icon set affiliations are: Unknown, Neutral, Red and Friendly. Select the affiliation then tap a location on the map interface to drop the marker.
When placing markers, WinTAK will use a default naming convention. To change the standard naming convention of CoT Markers to a custom name, enter text into the Custom Prefix, and/or Index fields and/or an increment value. Text entered into the Custom Prefix field will replace the name of each marker. The index number will begin with the index field entry and subsequent markers will be incremented by the value in the increment field.
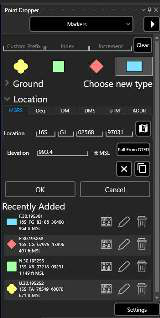
Entering a location manually
Select the Location drop-down arrow to manually enter a position for a marker to be placed on the map. WinTAK supports six formats for location entry: MGRS, Degrees, DM, DMS, UTM or Street Address. Select the Map icon to fill the fields using the current center of the map display. Elevation information for the marker can be manually entered or can be added by selecting the Pull from DTED button (when DTED is imported). Select OK to place the marker.
The recently added display lists the latest markers and provides quick access to Send, Edit or Delete those markers. Select any marker in the list to pan to it on the map display.

Mission Specific markers
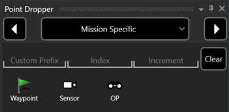
The Mission icon set allows the user to place mission specific markers including Waypoint, Sensor and Observation Point (OP). The Sensor marker allows the user to place a marker and then modify the Field of View (FOV) directly from the radial. The radial options are: Measure, FOV Width, FOV Range Length, Play Video (if configured), Sensor Details (with quick send from sub-radial) and Delete.

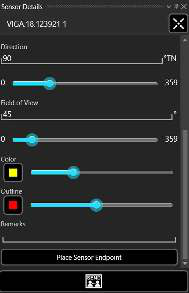
Select the details radial menu icon to open the Sensor Details panel. From this window, open the Fine Adjust feature to make changes to the coordinates. The Direction and Field of View of the sensor can be updated by entering the desired detail or by using the slider bar. The color of the FOV and FOV outline can be adjusted. Remarks can be added and a Sensor End Point can be added. Additionally, the sensor details can be sent to team members.

Vehicle Models
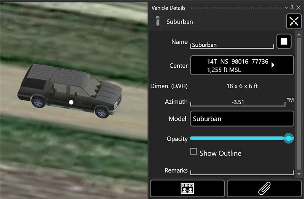
The Vehicle Models icon set provides to-scale 3D models of the selected icon. The available radial options are: Fine Adjust, Polar Coordinate Entry, Opacity, Measure, Change Heading, Edit, Labels On/Off, Breadcrumbs (with access to Track History from sub-radial), Details (with quick send from sub-radial), and Delete. Select the Vehicle Model details radial to modify the color, manually change the location, azimuth, model, opacity, add an outline and add remarks.

Importing points from .csv or .xlsx
In addition to placing points manually through the Point Dropper tool, points can also be imported into WinTAK from a .csv or .xlsx formatted file. This capability can be used in conjunction with the GRG Builder Plug-in to import points that mark buildings, rally points, etc.
Within the Spot Map icon set, select Import Points to open a Windows file explorer window that can be used to select the desired .csv or .xlsx file to be imported. The .csv and .xlsx files can also be imported by dragging and dropping them into WinTAK. The files need to be formatted in a specific way to ensure the import is successful.
Name (e.g., Callsign, Tag), Prefix (e.g., Callsign Prefix, Tag Prefix) and Location (e.g., Lat., Long., MGRS) columns are required for .csv and .xlsx file imports. The Elevation, Remarks, Color, and Type columns are optional attributes that can be applied to the markers being imported. If an imported marker is assigned the type b-m-p-s-m it will be imported as a spot marker, or a colored spot marker if a color is specified.
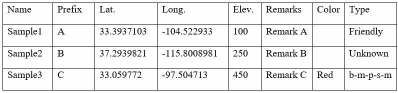
The Name and Prefix columns support alphanumeric characters. The Location column(s) supports coordinates, such as Lat and Long, in separate columns, or unified as one under the Location header. Latitude/Longitude supported formats are DM, DMS and DD. Coordinates can be formatted with or without white space in-between (ex. 45°45′45″ vs 45° 45′ 45″). MGRS coordinates are also supported.
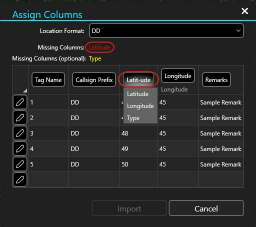
If issues with the .csv file are detected during the import, an Assign Columns window will appear. This window can be used to clarify location formats and alter marker types for the import. If the location format used doesn't match an option listed in the drop-down, 'Any' will be the ideal selection to use.
Click a column header to choose the appropriate option that matches the location format or select the Edit option beside a row to change the marker type.
Managing icon sets
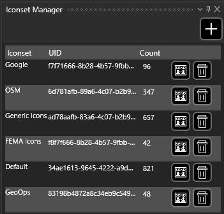
Use the Settings button at the bottom-right of the Point Dropper panel to open the Iconset Manager and display a list of installed icon sets to Send or Delete from the device.
Select the + icon to select and import a new icon set for use. Valid icon sets become immediately available in the Point Dropper Tool.
Marker radial options by affiliation
The options available for Unknown and Neutral Object Markers are: Delete, Polar Coordinate Entry, Fine Adjust, Measure, Breadcrumbs (with access to Track History from sub-radial) and Details (with quick send from sub-radial).
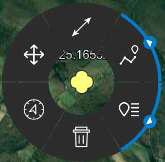
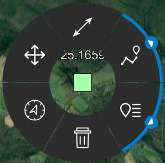
The options available for Red Object Markers are: Delete, Polar Coordinate Entry, Bullseye, Fine Adjust, Measure, Breadcrumbs (with access to Track History from sub-radial) and Details (with quick send from sub-radial).
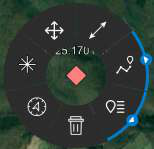
The options available for Friendly Object Markers are: Delete, Polar Coordinate Entry, Fine Adjust, Measure, Lock-On Friendly, Breadcrumbs (with access to Track History from sub-radial), and Details (with quick send from sub-radial). Enabling the Breadcrumb option generates a track, which can be reviewed using the Track History tool.

Marker Details
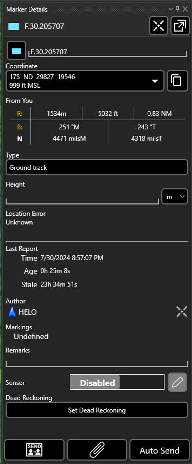
Select Details on the marker radial menu to make modifications that include: Name, Coordinate Location, Elevation, Marker Type, Height and Remarks. Selecting Marker Type opens a dialog box that provides additional categories to choose from. The Markings field displays classification information from Mil-STD-6090 CoT messages. Set the Sensor field to Enabled to display an FOV and configure a video alias for the marker.
Select the Attachments (paperclip) icon to attach files, including images, to the marker. Select the Send icon and choose individual marker recipients or Broadcast to send to all network members. Select the Auto Send option to broadcast the marker to other TAK users on the network; the information of the marker will be automatically resent about once every 60 seconds.
Dead Reckoning can be set for the marker from the Details panel. See the Range & Bearing module for more information on the Dead Reckoning feature.
Stale Marker Handling
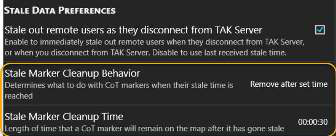
Stale marker behavior can be adjusted in Preferences. Select Settings > Control Preferences > Stale Data Preferences to specify when stale markers are removed from the map.
Preferences include removing markers immediately, after a specified time or left on the map. If Remove after set time is selected, the time interval in the Stale Marker Cleanup Time setting must be set.
Source
WinTAK Software User Manual, Version 5.7, 26 March 2026, pages 15–21.