ATAK Manager
Overview
Reference material for ATAK Manager in WinTAK, sourced from the official WinTAK 5.7 Software User Manual (26 March 2026).
Manual Reference

ATAK Manager is launched by selecting the ATAK Manager icon from the menu bar. ATAK Manager displays either the serial number of the device or the IMEI code of the device (if a SIM card is installed). This allows the user to quickly identify which device to update if multiple ATAK devices are connected.
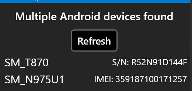
Device Details
The Device Details screen displays which version of ATAK is installed, the amount of space available on internal storage and external storage (if present), and displays a list of file types that can be imported/exported between ATAK and WinTAK. Select Install or Update next to the ATAK version number to launch a Windows File Explorer window. From this window, select the ATAK .apk file to be installed on the ATAK device. Selecting the APK will push the file to the device and then install it.
The Storage portion of the screen displays the amount of free/used space available on the internal and external (if present) SD cards.

Transferring files
The Files section allows the ability to transfer Imagery, Overlays, DTED, Image Overlays, Videos or Data Packages between ATAK and WinTAK devices.
Select the type of data to be transferred and whether to Export data from WinTAK to ATAK or Import data from ATAK into WinTAK. Files can also be imported from an ATAK device's external SD Card.
Selecting the Export option opens a Windows file explorer window to the default WinTAK directory for that data type. Select the file(s) to export and ATAK Manager will copy the files to the correct location in the ATAK directory structure.
Selecting the Import option will display a list of files on the ATAK device matching the selection. Select the desired file(s) and click on the Import button. The files will be copied to the default WinTAK directory for that data type.

Device Profiles
A device profile can be created to quickly load preset data onto an ATAK device. Under the ATAK Manager icon, select Device Profiles, then the + button to create a new profile. This will open the Create Device Profile window. Select the + button to add APKs, Mission Packages, Imagery, Overlays, DTED, Image Overlays and Videos to the profile.
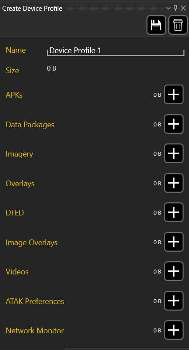
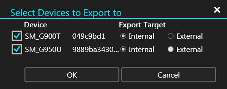
This profile can be exported to a single device or to multiple devices at once. The Device Profile can also be exported to either the internal or external (removable) SD card.
Source
WinTAK Software User Manual, Version 5.7, 26 March 2026, pages 81–82.