Video Player
Overview
Reference material for the Video Player tool/feature in ATAK, sourced from the official ATAK 5.7 Software User Manual (chapter 15, "Video Player").
Manual Reference
Select the Video Player icon to open the Video player. The Video Player supports playing video streams from IP cameras, Rover5 and H.264 encoders. The menu provides options to add, edit, delete, play or send videos to other network members.

The toolbar available at the top of the video player window can be used to view video snapshots, add new video alias, download an alias from the TAK Server, sort, multi-select, to either export or delete, or search for a specific alias.
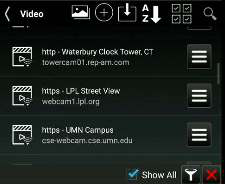
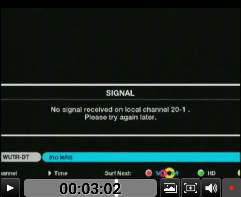
Select the desired video alias or file name to begin playing the stored or streaming video. The video will display half the width of the screen. It will provide options for play/pause, elapsed time, view stored snapshots, snapshot the video, record video and mute/unmute.
Note: the mute/unmute option only displays for local and streaming video with audio.
To view a video at full screen, slide the pull bar. To return to half screen, press the device’s back button. Select the Back button to return to the list of available videos.
To add a stored video file, select the Import Manager icon, select Local SD, and navigate to the video file and select OK to add the video to the list of available videos. The user can also manually place video files in atak/tools/videos/ to be listed after ATAK is restarted.
When a video is playing at half width, slide the pull bar to the right to hide the video but maintain the connection. Slide the pull bar to the left to unhide the video. The video player status is reflected in the Android notifications bar at the top of the screen.
Video Player
Select the Snapshot icon to save the current frame of the video as a JPEG image file, the icon will flash green to indicate that the snapshot has occurred. The file will be saved in \atak\tools\videosnaps.

Select a snapshot to view it in a larger format. While viewing a snapshot, a caption can be added to it. Select Send to send the snapshot to another TAK user, TAK server, or send through a 3rd party app. Select EXIF to burn overlay metadata onto the snapshot. Select Edit to edit the image in Image Markup, Image Markup must be installed for this option to appear. Select Pan To to pan to the location of the video source. Select an Arrow to cycle to the next snapshot.
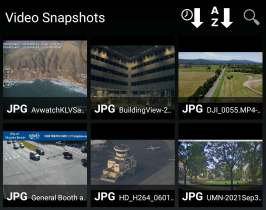


If a live UDP or an appropriately formatted RTSP stream is being viewed, it can be recorded by selecting the Record icon. The icon will change to a green square while recording. Select Auto Record to automatically start recording every time this video stream is opened. The Video Recording button will be hidden once activated. Stopping the recording will deactivate Auto Record.


Select the Record icon again to end the recording. The recordings are saved in /atak/tools/videos/.

To close the video player, select the X located at the bottom right corner of the video player or select the Back button.

Adding a Video Stream
To add a video alias, select + at the top of the Video Player screen.

Enter the necessary information for the selected stream type: Stream Type (UDP, RTSP, RTMP, RTMPS, TCP, RTP, HTTP, HTTPS, RAW, SRT) along with the necessary streaming information including, IP address (leave IP address blank to listen on the local IP), Port Number, Alias Name, Network Timeout, Buffering and Buffer Time. Selecting buffering along with a buffer time will provide a small amount of buffering of input video flow to help smooth video streams. Adding buffering will increase latency. When the necessary information is entered, select Add.
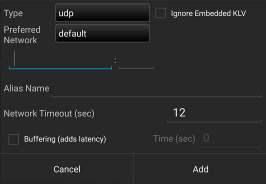
A video alias can also be added to a sensor marker from the Mission Specific iconset, or other marker types with the sensor option enabled. Open the details of the marker to configure the URL and FOV. After both the URL and the FOV are configured, the video alias can be viewed. These markers can also be sent to other users to share the video alias associated with them.
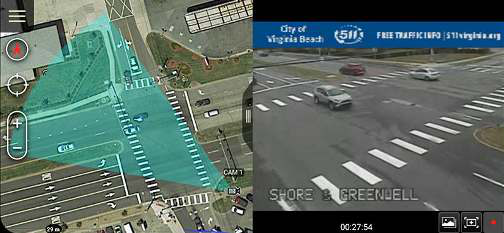
Downloading a Video Stream
To download a video alias from a TAK Server, select the Download icon at the top of the Video Player screen, then select the TAK Server. A list of available Video aliases will be presented. Select the desired video alias, then choose OK. The selected video will then be added to the list of videos.

Search for Video
To find a particular video alias from the list of available videos, select the Search icon at the top of the Video Player screen, then enter the name of the desired video.
Individual Video Options
To view additional options for individual videos, select the Additional Options icon. The options include sending the video alias to other contacts, editing the alias or deleting the alias.


The Send button will prompt the user to choose to send to Contacts or a TAK Server. If Contacts is selected, choose one or more contacts, then tap Send. Selecting Broadcast will send to all contacts.
To edit an existing Video Alias, select the Edit icon to access the same options as shown for the Add Video Alias option. During editing, the video alias can be renamed or redirected to a new address and port combination.
To delete an existing video, select the Delete icon, then confirm the deletion.
Viewing KLV
If a video includes associated metadata, an option will be available to view a representative SPI or CoT Marker. These markers indicate the map location of the sensor at the corresponding time viewed within the video player.
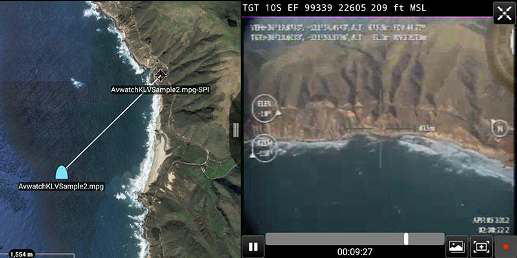
The SPI marker will indicate the center of view corresponding to that sensor as the video plays. The user may zoom to the SPI or CoT Marker by selecting the Zoom To icon on the video controls or may lock to an SPI by selecting the SPI on the map and selecting the Lock icon on the radial.
Note: This functionality is only available for live streams in UDP format if the KLV data is available as well.
Live Video Map Display
When the user has a video (video stream) with metadata for the four corners of the video, the user can view the video in the map interface. The user starts by opening the video and selecting the Globe icon in the upper right-hand corner of the video window, turning the globe green.
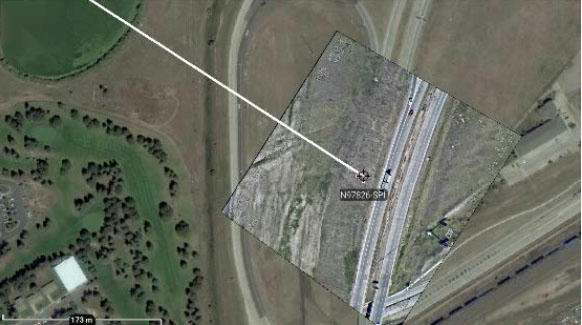

When the window is minimized, the video can be viewed on the map interface. The video will overlay upon any current imagery displayed.
Source
ATAK 5.7 Software User Manual, 13 March 2026 (Unclassified), pages 58–62.